Friday, April 27, 2012
More than just Tags...
Brigit has posted some sneak peeks of next weekend's tags class on her blog. Anyone attending this class will leave with a wealth of ideas tips and tricks for using a variety of media. Visit Brigit's blog here: http://itsjustpaperbrigit.blogspot.ca/2012/04/distress-inks-36-colours-and-counting.html and read the previous post for more class details. Then hurry in to reserve your space...don't miss out!!!
Friday, April 20, 2012
National Scrapbooking Day Classes

The second class is called "More than just Tags" and as Brigit has taken the time to write a detailed explanation of what the class covers, I'll include it in this post. Each person who pre registers for either class will receive a FREE Sizzix birdhouse die (one per customer.) We have tentatively scheduled the layout class for 10 am and the tags class for 2 pm on Saturday. Depending on the numbers we will offer one or both classes on Sunday also, so please register ASAP to get the time slot that works best for you.
Here is the Tags class info from Brigit:
More than Just Tags.
Technique Basics & Art Journal
Instructor:
Brigit Hampel
Ranger Certified Instructor
National Scrapbook Day Workshop at The Papercraft
Cafe
3 hours, $35
May 5TH Weekend
Class Description:
Do you want to know more about inks, embossing
powders and paints? Have you been under utilizing your stash or holding off
adding these items to your “art supplies”?
Well it is time to get a little messy as we explore some of the ways to
use these mediums.
This is a technique based class. You will probably
get a little messy (mostly your fingers) but you will gain a better
understanding of how to use a variety of products to achieve some amazing
results.
Some of the products we will use are:
ñ Distress Inks, Stains, Embossing Powders and Paints
ñ Adirondack dye and pigment inks
ñ Adirondack Alcohol Ink
ñ Assorted Embossing powders
Students will learn how to blend inks, create
their own mists, do a number of resist techniques, watercolour with ink, create
embellishments and more. The #8 manila tag will be the students primary canvas
but they will also use a variety of other “papers” to achieve a variety of
results.
Once the messy part is done, the tags and
embellishments will be displayed in an art journal* that students will create
and use as a reference guide. Here they will be able to showcase and refer to
the techniques learned in class.
Instruction sheets for the techniques learned in
class will be provided along with papers to create these displays.
*An 8-1/2” x 11” album/binder is not
provided
Some but not all inks will be provided. Students
are asked to bring whatever Distress Inks they have as well as their Ink
Blending tools. It is suggested that you use labels to mark your inks as your
own.
Embossing powders and paints will be provided but
if you have some colours you would like to work with, feel free to bring your
own.
As a Ranger Certified Instructor, the products
used in this class will all be from Ranger Inks.
A detailed list of the products used in class will
be provided.
Watch my blog for some sneak peeks of the
techniques that will be learned in class.
It's Just Paper
itsjustpaperbrigit.blogspot.com
Wednesday, April 18, 2012
Another flip card

Whew! The past couple of days were so busy that I ended up putting this together minutes before my first class of the week. Everyone is loving these Flip it Dies and I have more on order after the first batch sold out, but after today's class, I think those are spoken for too! I guess it's time for another order..LOL! I heat embossed the butterfly and coloured it with glitter gel pens. As always, much prettier in real life. You can sign up for a class to make this card and the previous two, either Thursday April 19th or Thursday April 26th. No card class next Tuesday or Wednesday. Thanks for taking a peek.
Sunday, April 15, 2012
Late again.


Once again I am late getting my class samples posted and I still have only two to share today. Yesterday, my sister Joan passed away less than four months after receiving her diagnosis of pancreatic cancer. While I am relieved that her suffering is over, my heart is with her husband Roy and my nephew and niece Michael and Charlotte, and it's so difficult to think of anything but their grief and our loss. I am so grateful for my faith at times like this and for the love and support of family and friends. If I have learned anything from this painful experience, it is to treasure each moment we have with those we care about, and to never take the gift of health for granted.
On with the cards. I took three views of the first card and they still don't capture how fun these "Flip It" cards are. The second card is also a different kind of fold and I love this 3-D look. I kept the front very simple so it's even more of a surprise when you open it up.
Hopefully I get the third sample done and up here by tomorrow night.
Saturday, April 7, 2012
Tuesday, April 3, 2012
Mini album class


Don't miss out on this fabulous class with Carolyn on Saturday April 14th at 10:30 am. The sample is on display at the store and was made using Bo Bunny's Timepiece Collection, which is on order and will be in stock next week. To register please stop in and pay the $20 class fee. You will also need to purchase a 6 x 6 mini pad of patterned paper and there is a great selection in store right now if you would prefer a different colour palette/theme than the sample. You will need to bring your own adhesives (including Scor tape) plus a pencil, ruler scissors and/or a trimmer.
Monday, April 2, 2012
Reach for the sky
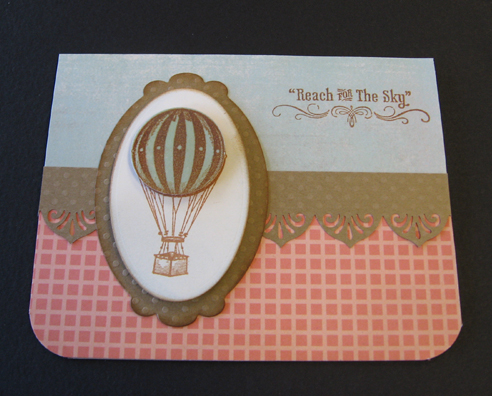
Here's the third class sample. The hot air balloon stamp is a mini clear stamp set which includes the sentiment: "May your travels lead you to some amazing places" I had a graduation card in mind when I made this so I used "Reach for the Sky" instead. This sentiment is a portion of another mini stamp set which includes a beautiful butterfly and the sentiment "Take Wing, reach for the sky" Both these stamps are just $2.50 each and are available at the store. I decided that I would use this sentiment more often, and so I carefully trimmed the "Take Wing" portion away and I'll still be able to use them together if I want to. I stamped the balloon in Sepia archival ink on neutral cardstock, then stamped just the upper portion onto a the same colour paper as the upper background of the card. I inked this part of the image with Versamark and sprinkled clear embossing powder onto it, then heated it for a glossy look. After punching out the circle, I popped it up with foam dimensionals. If you look very closely you can see that I accidentally glued the punched border on the wrong side of the paper...Oh well...now everyone knows how NOT to do it..LOL! This is a fun card to make and with some bright colours and a different sentiment would make a great birthday card for a child. I was rushing to get this done (hence the goof up!) and now I can see a few possibilities for embellishment. We'll see how much time there is in class after doing the other two cards and maybe we can step it up a notch. Thanks for taking a peek and comments are always welcome:)
Sunday, April 1, 2012
April cards

Here is card number one for this week and next week's classes. Love this layout which I snagged from the latest issue of "Cardmaps" magazine. I used one of the new papers from Kaisercraft's Fine and Sunny collection.

As always, the real deal is much more impressive than the photograph, so be sure to stop in and see this sample. It took me a while to figure out what to do with this awesome new stamp from Inkadinkado, but once I started playing, I got a little carried away. I heat embossed the peacock image in black, then coloured in all those beautiful feathers with the glitter gel pens. I always have trouble using black embossing powder and this time was no exception, so I decided to carefully trim around the image to get rid of all those pesky little black spots that I didn't see before I used the heat gun (Grrrr!) Then I searched the entire store for a background paper to complement the colours I had used, but nothing was working for me, so I decided to break out the alcohol inks and make my own background. Other than making a mess and stinking the place up with fumes from the ink it was fun and the result is gorgeous...if I do say so myself LOL! I finished it off with some gold foil and black metallic cardstock. The biggest issue I had was that the image wouldn't fit on a standard size card, so I had to improvise and hopefully no one will mind that the envelopes are a bit bigger than the card (sorry.) I haven't done the third card yet, but it will be a fairly simple one because the peacock one will take a while to complete. I'll upload the last sample by Monday night. Please bring your own gel pens to class if you have them or be prepared to buy them. I used a gold gel pen plus a green star and blue star glitter gel pen.
Subscribe to:
Posts (Atom)